Battery switch on travel trailer function is crucial for managing your RV’s power. Understanding how this system works – from its different types and wiring diagrams to troubleshooting common problems and ensuring safe operation – is key to a smooth and enjoyable camping experience. This guide breaks down everything you need to know, from basic operation to advanced maintenance and safety procedures, ensuring you’re equipped to handle any electrical situation on the road.
We’ll explore various battery switch configurations, their advantages and disadvantages, and how they interact with your trailer’s electrical system and different battery types (like lead-acid and lithium). We’ll also cover essential safety precautions and troubleshooting tips to help you avoid potential hazards and keep your RV running smoothly.
Understanding Battery Switch Functionality in Travel Trailers
Properly managing your travel trailer’s power is crucial for a successful trip. A battery switch is a key component in this system, allowing you to control the flow of power from your batteries to your trailer’s appliances and systems. Understanding its functionality is essential for preventing electrical issues and ensuring a smooth camping experience.
Types of Battery Switches
Travel trailers utilize several types of battery switches, each offering different levels of control and complexity. The most common are single switches, dual switches, and those incorporating battery isolators or combiners. Single switches offer simple on/off control for a single battery bank. Dual switches provide separate control for two battery banks (e.g., one for house batteries, one for starting the tow vehicle).
Systems incorporating isolators or combiners allow for charging both banks simultaneously while preventing discharge from one bank into the other. The choice depends on the trailer’s setup and power needs.
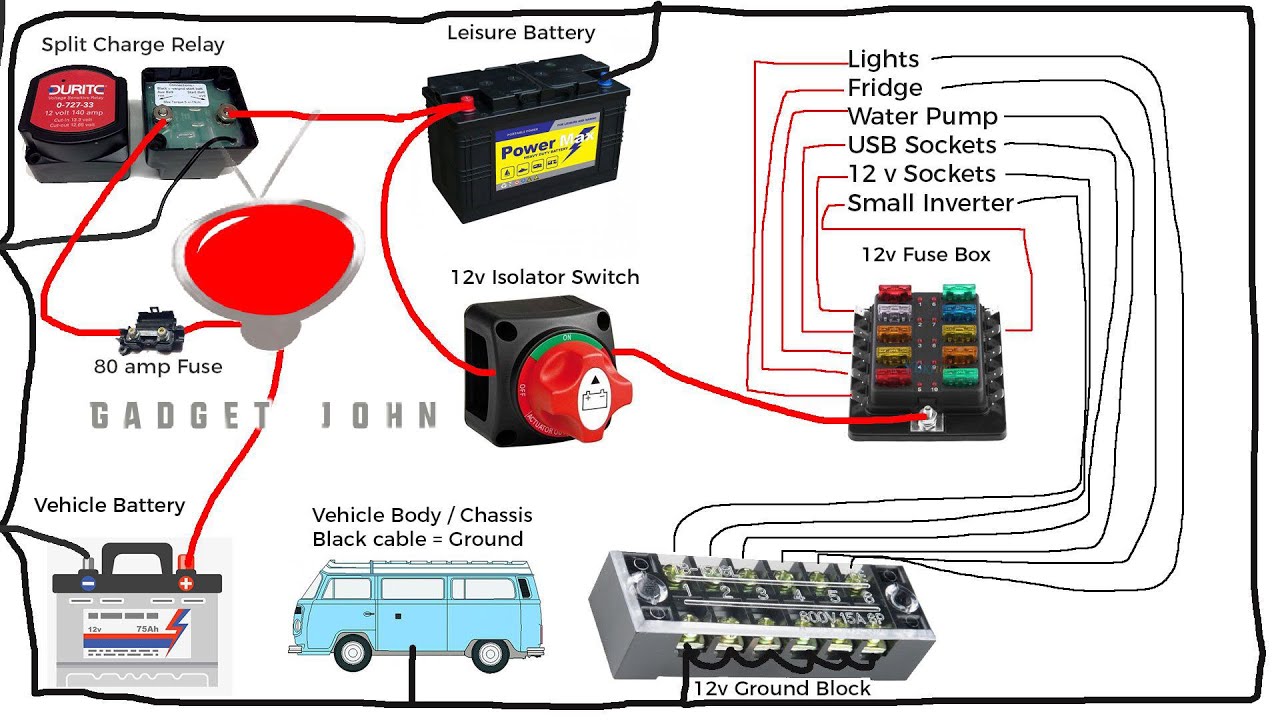
Typical Wiring Diagram of a Battery Switch System
A typical dual battery switch system would show two batteries (house and chassis) connected to their respective terminals on the switch. The switch then has output terminals that lead to the trailer’s electrical distribution panel. A separate charging circuit, often from the tow vehicle’s alternator or a solar panel, would also connect to each battery, potentially through a charge controller.
A ground wire connects all components to the trailer’s chassis. More complex systems might incorporate a battery combiner or isolator to manage charging and prevent battery drain between the two banks. Imagine a diagram: two batteries represented by circles, labeled “House” and “Chassis”, each connected by a wire to a rectangular box representing the switch. From the switch, another wire leads to a larger rectangle labeled “Distribution Panel”, with a final ground wire connecting to the chassis (represented by a larger, irregular shape).
Operating a Battery Switch
Operating a battery switch is usually straightforward. Most switches have clearly labeled positions, such as “Off,” “Battery 1,” “Battery 2,” and sometimes “Both.” Before operating the switch, always ensure that you understand the labeling and the implications of each position. To turn on a specific battery bank, simply move the switch to the corresponding position. To turn off all power, move the switch to the “Off” position.
Consult your trailer’s manual for specific instructions and safety precautions. Remember, incorrect operation can lead to electrical damage or personal injury.
Advantages and Disadvantages of Different Battery Switch Configurations, Battery switch on travel trailer function
A single battery switch system is simple and inexpensive but lacks the flexibility of managing multiple battery banks independently. Dual battery switch systems offer greater control, allowing separate management of house and starting batteries, preventing deep discharge of the starting battery. However, they are more complex and expensive. Systems with isolators or combiners provide optimal charging and prevent cross-discharge, but add to the system’s complexity and cost.
The best configuration depends on your needs and budget. For example, a camper who frequently uses high-power appliances might benefit from a dual-battery system or a system with a combiner to ensure sufficient power. Someone with a smaller trailer and simpler needs might find a single battery switch sufficient.
Troubleshooting Common Battery Switch Issues
So, your travel trailer’s battery switch isn’t cooperating? Don’t worry, it’s a fairly common problem. Let’s go through some troubleshooting steps to get you back up and running. Understanding the potential issues and how to address them can save you a lot of frustration and potentially expensive repairs.This section will cover some of the most frequent problems encountered with travel trailer battery switches, along with practical solutions.
We’ll also examine situations where your battery might be dead despite a seemingly functional switch.
Common Battery Switch Problems
Several issues can prevent your battery switch from working correctly. These problems range from simple user errors to more complex electrical faults. Understanding these potential issues is the first step towards effective troubleshooting.
- Loose or Corroded Connections: Over time, connections can become loose or corroded, leading to poor electrical contact. This is especially true in damp environments.
- Faulty Switch Mechanism: The switch itself might be malfunctioning due to wear and tear, damage, or internal failure. This could manifest as the switch not switching positions, or making poor contact.
- Wiring Issues: Damaged or improperly connected wires can disrupt the flow of electricity, preventing the battery from charging or powering the trailer.
- Blown Fuse or Circuit Breaker: A blown fuse or tripped circuit breaker in the battery switch circuit will interrupt the power flow.
Troubleshooting Steps for a Malfunctioning Battery Switch
Before calling an RV technician, try these simple steps. They often pinpoint the problem quickly.
So, you’re an audiophile who travels? Awesome! Check out this guide on building the perfect audiophile travel setup to ensure your ears are always happy on the road. Don’t forget to secure your trip with solid travel insurance; getting Aon travel insurance is a smart move for peace of mind, protecting your gear and yourself against unexpected issues.
Planning ahead makes all the difference for a smooth and enjoyable trip, no matter where your adventures take you.
- Visual Inspection: Begin by carefully inspecting the battery switch and all related wiring for any visible damage, loose connections, or corrosion. Look for signs of burning, melted plastic, or exposed wires.
- Check Connections: Tighten any loose connections. If you find corrosion, clean the terminals with a wire brush and baking soda solution. Apply a corrosion inhibitor afterward to prevent future issues.
- Test the Switch: Attempt to operate the switch several times. If it feels stiff or doesn’t move smoothly, it might need replacement. Listen for any unusual sounds like clicking or grinding, indicating a problem within the switch mechanism.
- Inspect Fuses and Circuit Breakers: Check the fuse or circuit breaker associated with the battery switch. Replace any blown fuses with the correct amperage rating. Reset any tripped circuit breakers.
- Test with a Voltmeter: Use a voltmeter to check the voltage at the battery terminals and at the input and output points of the battery switch. This will help determine if the problem lies within the switch itself or elsewhere in the circuit. A significant voltage drop across the switch indicates a problem.
Causes of a Dead Battery Despite a Functional Switch
Even with a properly functioning switch, several factors can lead to a dead battery. It’s crucial to rule these out before assuming the switch is at fault.
- Parasitic Drain: A small but persistent electrical drain from devices left on can deplete the battery over time, even if the switch is off. This is especially common with poorly maintained or improperly installed electronics.
- Faulty Battery: The battery itself may be old, damaged, or simply failing to hold a charge. A battery load test will determine its health.
- Alternator Problems: If the tow vehicle’s alternator isn’t charging the battery properly during travel, the battery will eventually discharge.
- Insufficient Solar Panel Charging: If relying on solar panels, ensure they are correctly installed, positioned for optimal sunlight exposure, and are producing sufficient power to charge the battery.
Troubleshooting Flowchart
Imagine a flowchart. Start with “Battery Dead?”. If yes, check the switch for obvious issues (loose connections, corrosion). If issues are found, fix them and retest. If not, check the fuses and circuit breakers.
So, you’re an audiophile who travels? Awesome! Check out this guide on building the perfect audiophile travel setup to keep your ears happy on the go. It’s crucial to protect your investment, so don’t forget to look into getting Aon travel insurance for peace of mind. That way, your precious gear is covered if anything goes wrong during your adventures.
Happy listening and safe travels!
If those are fine, test the battery itself using a load tester. If the battery is faulty, replace it. If the battery is good, investigate parasitic drains by disconnecting accessories one by one and checking voltage. If a parasitic drain is found, address the issue. If no issues are found in these steps, it might be time to call an RV technician for further diagnosis.
Battery Switch and Electrical System Integration: Battery Switch On Travel Trailer Function
Your travel trailer’s battery switch acts as the central control for your 12-volt DC system, influencing everything from lights and water pumps to refrigerators and even some AC systems (if equipped with an inverter). Understanding its interaction with other electrical components is crucial for safe and efficient operation. This section will detail the relationship between the battery switch and your trailer’s overall electrical system, including shore power integration and important safety considerations.
The battery switch is the gatekeeper for your DC power. When it’s in the “off” position, all power to the 12-volt system is disconnected, preventing accidental drain. In the “battery” position, power flows directly from your trailer’s battery to the 12-volt appliances. When connected to shore power, and the switch is in the “on” position, the system will typically charge the battery and simultaneously power the 12-volt appliances.
The interaction between the switch and the shore power connection varies depending on your trailer’s wiring, but this is the general operation.
Typical Amperage Draw of Appliances
Understanding the power consumption of your appliances helps in managing battery life and preventing overloads. The following table provides estimates; actual amperage draw can vary slightly depending on the appliance and its load. Always consult your appliance’s specifications for accurate data.
| Appliance | Amperage Draw (Amps) | Operating Time (Hours) | Total Amp-hours (Ah) |
|---|---|---|---|
| Interior Lights (LED) | 1-2 | 8 | 8-16 |
| Water Pump | 5-7 | 0.5 | 2.5-3.5 |
| Refrigerator (12V) | 7-10 | 24 | 168-240 |
| Furnace Fan (12V) | 3-5 | 2 | 6-10 |
| Television (12V) | 2-4 | 3 | 6-12 |
Battery Switch and Shore Power Interaction
When you connect your travel trailer to shore power (AC), the converter charges your battery. The battery switch’s position affects how this charging happens and how your 12V system operates. With the switch “off,” the battery is isolated, and the 12V system is completely inactive; the converter will still charge the battery (if your system is wired this way). With the switch in the “on” position, the converter charges the battery, and the 12V system is powered by the battery (with the converter topping up the battery).
In the “battery” position, the 12V system is powered directly from the battery, regardless of whether shore power is connected.
Safety Precautions When Working with the Battery Switch and Electrical System
Always disconnect the negative (-) battery terminal before performing any maintenance or repairs on your travel trailer’s electrical system. This prevents accidental shorts and protects you from electric shock. Never work on the electrical system when it’s raining or in damp conditions. Use insulated tools and wear appropriate safety gear, including eye protection. If you are unsure about any aspect of your trailer’s electrical system, consult a qualified RV technician.
Improper wiring or handling of electrical components can lead to serious damage or injury.
Battery Switch and Different Battery Types
Choosing the right battery type for your travel trailer significantly impacts your system’s performance and the lifespan of your battery switch. Different battery chemistries have varying voltage outputs, discharge rates, and susceptibility to sulfation or other forms of degradation, all of which affect how your battery switch operates and ages.Understanding the interplay between battery type and battery switch is crucial for optimal performance and longevity.
Lead-acid batteries, while common and affordable, differ significantly from lithium batteries in their characteristics, demanding different considerations for your switch setup.
Lead-Acid Battery Performance with Various Switch Configurations
Lead-acid batteries, including flooded, gel-cell, and AGM types, are generally compatible with most standard battery switches. However, their lower voltage output and susceptibility to sulfation (a build-up of lead sulfate crystals that reduces battery capacity) can impact the switch’s performance over time. Using a switch designed for higher amperage is recommended to handle the higher current draw during charging and starting, especially with larger lead-acid batteries.
A poorly designed or undersized switch can overheat and fail prematurely, potentially causing damage to the battery or other components in the system. Simple on/off switches are usually sufficient, though more sophisticated switches offering parallel charging capabilities might improve charging efficiency.
Lithium Battery Performance with Various Switch Configurations
Lithium batteries, while more expensive, offer higher voltage, faster charging rates, and longer lifespans compared to lead-acid. Their higher energy density allows for more compact battery banks. However, lithium batteries often require more sophisticated charging and protection systems. A standard battery switch may not be sufficient; a battery management system (BMS) is typically necessary to monitor voltage, current, and temperature, preventing overcharging, over-discharging, and other damaging conditions.
Using a battery switch with lithium-compatible features or integrating a BMS with the switch is crucial to protect both the batteries and the switch itself. Improperly managing lithium batteries can lead to rapid degradation or even fire hazards.
Impact of Battery Chemistry on Battery Switch Lifespan
The battery chemistry directly impacts the lifespan of the battery switch. Lead-acid batteries, especially flooded lead-acid, can produce more corrosive gases during charging and operation. These gases can corrode the switch’s internal components over time, shortening its lifespan. Lithium batteries, while generally cleaner, can still generate heat during charging and discharging. Excessive heat can also damage the switch’s internal components.
A high-quality switch, designed for the appropriate amperage and battery type, will have a longer lifespan, regardless of the battery chemistry used.
Battery Switch Maintenance Differences Based on Battery Type
Proper maintenance extends the lifespan of both your batteries and your battery switch. Here’s a summary of key differences in maintenance depending on your battery type:
- Lead-Acid Batteries: Regular visual inspection for corrosion on terminals and connections is crucial. Cleaning terminals with a wire brush and baking soda solution is recommended. Ensure proper ventilation to prevent the build-up of corrosive gases. Periodically check the electrolyte level (if applicable) and add distilled water as needed. The battery switch itself should be inspected for any signs of corrosion or overheating.
- Lithium Batteries: Lithium batteries generally require less maintenance than lead-acid batteries. Regularly monitor the battery voltage and temperature using a BMS. Keep the battery terminals clean and ensure proper ventilation. Lithium batteries are sensitive to extreme temperatures, so storing them in a cool, dry place is essential. The battery switch (often integrated with the BMS) might require periodic software updates or checks for fault codes.
Mastering your travel trailer’s battery switch is more than just knowing how to flip a switch; it’s about understanding your RV’s electrical system and ensuring safe and reliable power for your adventures. By following the maintenance tips, troubleshooting steps, and safety guidelines Artikeld in this guide, you can confidently manage your power, prevent problems, and enjoy worry-free camping trips.
Remember, regular checks and preventative maintenance are your best allies in keeping your RV’s electrical system functioning optimally.
Question & Answer Hub
What happens if I accidentally leave my battery switch in the “off” position?
Your house batteries will be disconnected from the trailer’s electrical system, preventing power to appliances and lights. You’ll need to turn the switch to the “on” position to restore power.
Can I use a battery switch with different battery chemistries (e.g., lead-acid and lithium)?
It’s generally not recommended to directly connect vastly different battery chemistries without proper isolation and voltage management. Consult a qualified RV technician to ensure compatibility and safety.
How often should I clean my battery switch terminals?
At least once a year, or more frequently if you notice corrosion or poor connections. Cleaning prevents voltage drop and ensures reliable power.
What size breaker should I use for my battery switch?
The appropriate breaker size depends on the amperage capacity of your battery and wiring. Check your owner’s manual or consult an electrician for the correct sizing.
